In my last post in this series I recounted the journey Carolyn and I made from Lisbon to Porto during our short break earlier this year to Portugal, and this final post looking at other key sites in Porto concludes this series with a link below to the previous post and the others in this series.
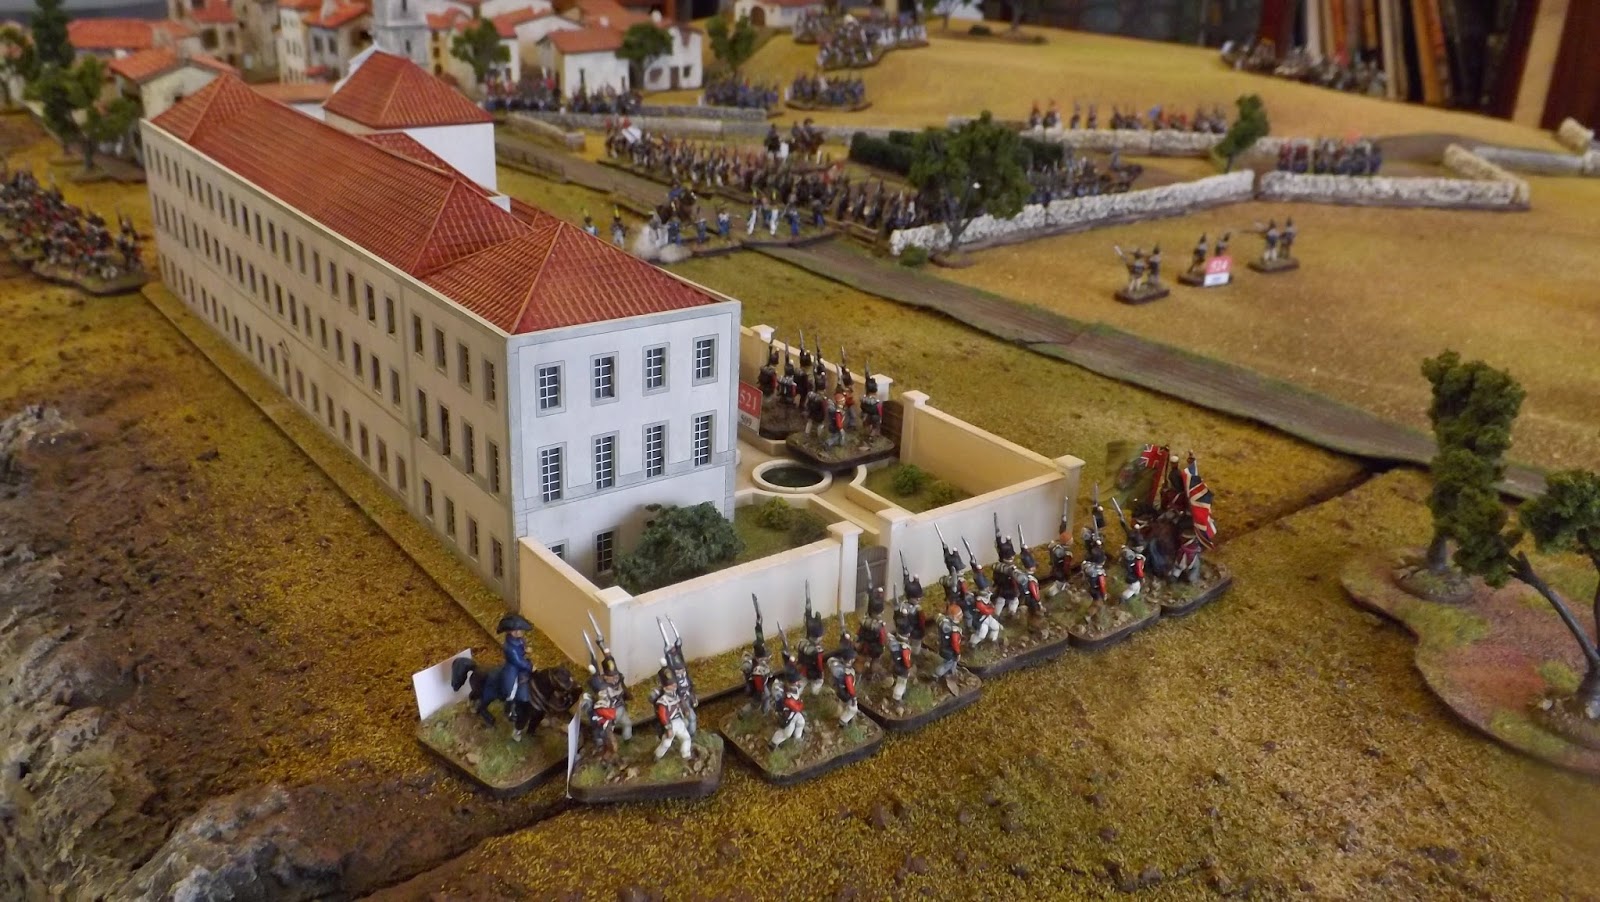
The build itself was documented here on the blog back in March 2014, as I assembled my table based on Sir John Fortescue's map gridded in one foot squares to guide the build for my 18mm collection of figures using Carnage & Glory computer moderated rules and later Over the Hills, paper based rules, this time on a simpler layout, minus the gorge, in preparation for the game as a scenario in the O'er the Hills scenario book.
The whole build process, planning and preparation together with the first of several games run using the set-up was documented in Miniature Wargames 379, 380 and 381, 2014/15, and the pictures of the game in progress are included in this post to add some extra context to the pictures from our visit, some ten years later.
 |
| British troops man the Bishop's Seminary in one of our several C&G games |
Point 2 - Porto City
Picking up from where I left off in the previous post our journey through Porto city soon found as heading to Praça da Batalha or Battle Square, so named because of the 10th-century battle fought between the Moorish forces of Al-Mansur Ibn Abi Aamir and the inhabitants of Porto, which resulted in the defeat of the latter and the destruction of the city.
 |
| French troops can be seen marching to the city gate as they prepare to leave the town along the road to Valongo. |
The square was urbanised in 1861, when a statue of King Pedro V of Portugal, standing over a pedestal, was erected right in front of Batalha Palace. The statue is a work by sculptor Teixeira Lopes (father) which was inaugurated in 1866.
The square also marks the site of one of the old city wall gates that was demolished in the eighteenth century and seems a likely route of exit for Marshal Soult's French troops first to reinforce Foy's attack on the Seminary and later as a retreat route as their hasty exit from the city began along the road to Valongo, and as we made our way following in their footsteps out towards the Church of Bomfin at Point 5.
Sir Charles Oman described the situation Soult suddenly found himself facing on the morning of the 12th May 1809;
'The Duke of Dalmatia had sat up all night dictating dispatches, and making his arrangements for a leisurely flitting, for he intended to stay two days longer in Oporto, so as to cover the march of his other divisions towards Amarante and Villa Real.
 |
| General Maximilien Sébastien Foy - Horace Vernet |
His desk-work finished, he went to bed at about nine o'clock, in full confidence that he was well protected by the river, and that Wellesley was probably engaged in the laborious task of bringing up boats to the mouth of the Douro, which would occupy him for at least twenty-four hours. The staff were taking their coffee, after a late dejeuner, when the hoof-beats of a furious rider startled them, and a moment later Brossard, the aide-de-camp of General Foy, burst into the Villa shouting that the English had got into the town.
 |
| '. . Foy had just discovered the enemy passing by boats into the Seminary, and was massing his brigade for an attack upon them.' |
Led to the Marshal's bedside, he hurriedly explained that Foy had just discovered the enemy passing by boats into the Seminary, and was massing his brigade for an attack upon them. The Marshal started up, sent his staff flying in all directions to warn the outlying troops, ordered all the remaining impedimenta to be sent off on the Vallongo road, and dispatched Brossard back to Foy to tell him to ' push the English into the river.' He was hardly dressed and on horseback, when the noise of a distant fusillade, followed by heavy artillery fire, gave the news that the attack on the Seminary had already begun.
It had been only at half-past ten that Foy, riding along the heights by the Chapel of Bom Fin, had been informed that there were boats on the river, filled with red-coated soldiery. It took him wellnigh three-quarters of an hour to bring up his nearest regiment, the 17th Leger, and only at 11.30 did the attack on the Seminary begin.'
Point 3 Serra Convent & Monastery
The Serra Convent and the Monastery dominate the heights overlooking Villa Nova, where we were staying, and the city of Porto on the opposite bank, which facilitated Wellesley's morning reconnaissance of the French defences resulting in his determination to take advantage of their lax patrolling on the upper reaches of the Douro, as well as allowing him to conceal his forces assembling for readiness to act on immediate orders.
As well as being an important part of any Peninsular War tour of Oporto, the Serra is also a very popular tourist attraction, offering the same splendid views that Sir Arthur Wellesley took full advantage of, as recounted by Oman in my first post, as we took our boat trip to see the crossing site used by Hill's brigade to gain access to the Seminary.
To enable easy access to the heights for pedestrians visiting Villa Nova, there is a very convenient cable car that runs back and forth and so we jumped aboard to enjoy that convenient comfort as well as some further views out over the city.
The Dom Luís I Bridge, or Luís I Bridge, is a double-deck metal arch bridge that spans the river Douro between the cities of Porto and Vila Nova de Gaia in Portugal. At the completion of its construction on the 30th October 1866, its 564 ft span was the longest of its type in the world.
 |
| The Dom Luís I Bridge seen from our cable-car |
.gif) |
| A view of the initial construction of Dom Luís I Bridge from the river Douro's mouth (1881–1886) |
The monastery building together with the neighbouring convent are part of an army barracks with just certain areas around the monastery open to the public to enable the views over the city, and at night the alcoves seen at the base of the building in the picture below are lit up forming a perfect backdrop to the diners using the quayside restaurants in Porto and Villa Nova.
 |
| The convent and monastery grounds is home to an army barracks, complete with several old pieces of artillery, but obviously the land is not accessible to the public. |
As well as the viewing area, the road leading up to the
Dom Luís I Bridge can be seen, now pedestrianised with the City tram way occupying the central area, but part of the roadway that the British troops must have used as they marched into town from Lisbon.
As you can see below, the view over the city is stunning and shows exactly the advantage it offered Wellesley in the planning of his assault, however you can see that from here the Seminary is not visible around the bend in the river to the right of picture, that meant the British general and his staff had to relocate to the convent garden in that area, where the final decision to begin the crossing as well as arranging the British and KGL guns would have likely been made.
 |
| The view from the monastery lookout of Porto and Villa Nova to the left and from where Wellesley would have made his initial assessment of French defensive arrangements. |
 |
| The view towards the bend in the river and the Convent building with the Ponte Infante Dom Henrique, or Infante Bridge over the gorge near to the area where the British guns would have deployed. |
Because access in this area is limited, we had to make a circuitous route around the back of the monastery area to come out on the road leading down to the Infante Bridge, observing a few old artillery pieces in the grounds along our way.
 |
| Not a shrapnel firing KGL 5.5inch howitzer, but pointing in approximately the same direction as Wellesley's guns back in May 1809. |
During the battle for Porto that developed as soon as the French discovered the British bridgehead, Wellesley continued to monitor the situation from his advanced lookout as described;
'Wellesley, from his eyrie on the Serra heights, had been watching for the long-expected outburst of the French. The moment that they came pressing forward, he gave orders for the eighteen guns in the convent garden to open upon them. The first shot fired, a round of shrapnel from the 5 1\2-inch howitzer of Lane's battery, burst just over the leading French gun on the further bank, as it was in the act of unlimbering, dismounted the piece, and by an extraordinary chance, killed or wounded every man and horse attached to it.
A moment later came the blast of the other seventeen guns, which swept the level ground to the west of the Seminary with awful effect. The French attack reeled back, and the survivors fled from the open ground into the houses of the suburb, leaving the disabled cannon behind them.
 |
| The view from the likely site for Wellesley's guns, providing as it does excellent views towards the Seminary on the opposite back and fields of fire against French troops coming from Porto over what then would have been fairly open ground, rather than the built up areas seen today. |
Again and again they tried to creep forward, to flank the English stronghold, and to fire at the barges as they went and came, but on every occasion they were swept away by the hail of shrapnel. They could, therefore, only attack the Seminary on its northern front, where the buildings lay between them and the Serra height, and so screened them from the artillery. But in half an hour the 17th Leger was beaten off and terribly mauled; they had to cross an open space, the Prado do Bispo, in order to get near their adversaries, and the fire from the garden wall, the windows, and the flat roof of the edifice, swept them away before they could close.'
 |
| 'Again and again they tried to creep forward, to flank the English stronghold, and to fire at the barges as they went and came, but on every occasion they were swept away by the hail of shrapnel.' |
Point 4 - Bishop's Seminary & Porto Military Museum
Having walked to the convent garden area where Wellesley's guns fired in support of the British troops occupying the seminary, it was another short walk across the busy Infante Bridge to turn right and enter the streets leading up to the Bishops Seminary, still looking very much as it would have done back in May 1809 and one of those pivotal buildings that dominate the history of the Napoleonic era, be that Hougomont or La Haye Sainte at Waterloo of the granary at Aspern Essling.
Oman continues his description of the battle around the Seminary now growing in intensity as Foy threw his troops forward against the northern wall as they sought to avoid the British artillery fire;
'Meanwhile the English suffered little: the only serious loss sustained was that of General Edward Paget, whose arm was shattered by a bullet. He was replaced in command by Hill, who (like him) had crossed in one of the earlier barges. The number of troops in the building was always growing larger, the Buffs were all across, and the 66th and 48th were beginning to follow.
After a short slackening in the engagement, General Delaborde came up, with the three battalions of the 70th of the line, to support his brigadier. This new force executed a far more sustained and desperate attack on the Seminary than had their predecessors.
 |
| The view of the Bishop's Seminary from the Infante Bridge |
Hill in his letters home called it 'the serious attack.' But it had no better fortune than the last: a thousand English infantry, comfortably ensconced behind stone walls, and protected on their flanks by the storm of shot and shell from the opposite bank of the river, could not easily be moved.  |
| The view back towards the monastery and convent area on the Serra from where we had walked from the cable-car. |
So well, indeed, were they covered, that in three hours'' fighting they only lost seventy-seven men while the open ground outside was thickly strewn with the dead and wounded Frenchmen.
 |
| The Bishop's Seminary, now the Salesians school. |
 |
| 'General Delaborde came up, with the three battalions of the 70th of the line, to support his brigadier.' |
Close by the Seminary building is the Porto Military Museum housed in the Rua do Heroísmo, and where the delegation of the former secret police PIDE/DGS used to be located between the 1940s up to 1974, with the museum guide ghoulishly informing us that back in the 70's you would have heard the screams of torture resounding from open windows, thus reminding everyone to not come to the attention of the authorities.
 |
| The Porto Military Museum housed in the Rua do Heroísmo |
In 1977, the Revolutionary Council, created after the Carnation Revolution of 25th April 1974, legislated the founding of the Museu Militar do Porto, and after the proper adaptation of the building and installation of all the contents, the inauguration took place on 21st March 1980 by the President of the Republic, Ramalho Eanes.
This small museum houses a model collection and items relating to the history of the Portuguese army throughout the centuries, and with a pavilion area of twentieth century artillery, but I have confined myself to focussing specifically on those items covering the Napoleonic War, starting with some pieces of uniforms that characterised the look of the Portuguese troops in the Peninsular War.
.jpg) |
William Beresford, 1st Viscount Beresford - William Beechey
Marshall of the Portuguese Army.
Beresford quickly overhauled the Portuguese forces, bringing them in line with British discipline and organization, and from the General Headquarters (then at the Largo do Calhariz), he dispatched many "daily orders" altering points of the infantry ordnance, creating a general command of artillery, establishing the separation of the battalions, firing incompetent or corrupt officers and promoting or appointing appropriate replacements. |
The exiled Portuguese Government in Rio de Janeiro, Brazil, whereto the Portuguese Royal Family had set up a court in exile, realised the necessity of appointing a commander-in-chief of their forces with the home country facing occupation by the French, a commander capable of training, equipping and disciplining the demoralised Portuguese Royal Army.
 |
| The British style 'stovepipe' shako which replaced the 'barretina' around 1810-11, bearing the front plate of the 1st (la Lippe) regiment sporting a uniform coat with blue collar, white cuffs and white piping and turnbacks. |
The Portuguese government asked Britain to appoint Arthur Wellesley to this role, Wellesley indicated he could not do the role justice due to his prior engagements and recommended lieutenant-general William Carr Beresford, who was appointed Marshal and Commander in Chief of the Army by Decree of 7th March 1809 and took the command on 15th of the same month.
 |
| There was no sign indicating these jackets were other than original, which considering the moth damage visible I have assumed they are. |
In 1809, following the Battle of Corunna, the Portuguese Army was reconstituted under the initiative of the Secretary of War Pereira Forjaz and re-trained by the British under the direction of Beresford, with most of the 1807 re-organization retained, but with the addition of the newly raised independent battalions of caçadores, that would become famous in the Peninsular War.
 |
| Loyal Lusitanian Legion, a foreign corps of three infantry battalions, a dragoon regiment and an artillery company of six guns, raised in London and Oporto by the British Treasury and commanded by Sir Robert Wilson, with 65 British and 35 Portuguese officers, and Portuguese other ranks. |
These were formed mainly by the transformation of previous irregular voluntary units and of the Loyal Lusitanian Legion, with six of these battalions were raised in 1808 by order of Secretary Pereira Forjaz, with six additional ones being raised in 1811. The lack of experienced Portuguese officers was mitigated by the inclusion of a number of British officers in the several Army units, in a way that most of them had a Portuguese commanding officer and a British second in command or vice versa.
 |
| At left the dark green uniform of the Loyal Lusitanian Infantry and right an unidentified jacket. |
The Militias were augmented with newly raised special units, including the infantry and cavalry regiments of the Royal Commerce Volunteers, the 1st and 2nd battalions of national artillerymen of Lisbon, the 1st and 2nd battalions of national caçadores of Lisbon and the Battalion of the Royal Volunteers of Porto.
 |
The Loyal Lusitanian Legion LLL was initially a fine quality unit under the command of Sir Robert Wilson, performing a number of punishing raids against the French on the Portuguese border and fighting a fierce rearguard action against Marshal Victor's troops at the Alcantara bridge, which I visited in 2019, link below
JJ's Wargames - Battles and Actions in the Tagus Valley |
Active units of Ordenanças were also raised, including the sixteen national legions for the defence of Lisbon (each with three battalions) and a number of Ordenanças artillery companies for the garrison of fortresses, these being mainly employed in the Lines of Torres Vedras.
 |
| A caçadore of the 6th (Oporto) Regiment |
The beneficial results of Beresford's efforts were proven during the campaign against Marshal André Masséna in particular at the Battle of Buçaco on 27th September 1810 where the Portuguese troops played a prominent part, and also in the defence of Lisbon in the Lines of Torres Vedras.
 |
| To right is a caçadore jacket with the yellow facings of the 6th regiment as seen above. The black shoulder fringe might indicate an 'atiradore' jacket, which would be mirrored with a black plume on the shako, indicating the 'sharpshooter' company armed with Baker rifles. |
By the summer of 1811 there were ten brigades of Portuguese infantry each of two regiments, each of two battalions and later an additional battalion of caçadores, with six attached to British infantry divisions, two acting as independent brigades and two others forming an-all Portuguese infantry division.
Alongside the infantry, the Portuguese organised seven companies of foot artillery, similarly organised as their British counterparts, and by 1812 these were increased to eight, three with five 6-pdrs and a howitzer and the other five with five 9-pdrs and a howitzer.
 |
| Portuguese blue line infantry jacket with the blue collar, yellow cuffs and white piping indicating the 7th (Setubal) Regiment |
 |
| An illustration of two Portuguese ensigns with the swords and gorgets carried by officers |
 |
| Portuguese officers 1806 infantry pattern sword (right) and a 1796 pattern cavalry sabre (left) |
Beresford's success in reorganising the infantry and artillery was not mirrored with the reform of Portuguese cavalry, mainly due to the fact that good infantry are cheaper to equip and far easier to train than cavalry and that good horses were in even shorter supply; creating a vicious circle insomuch that without horses it was impossible to create efficient cavalry, yet at the same time, as long as the cavalry remained inefficient there was a certain reluctance to allocate them horses and forage, badly needed for the British army, and resulting in only six out of twelve cavalry regiments ever being fully mounted.
 |
| Portuguese dragoons, sabres drawn. |
 |
| A barretina shako plate as seen worn by my Portuguese 10th Infantry below. |
 |
My interpretation of the Portuguese 10th (Lisbon) Infantry Regiment, sporting their 'barretina' shakos, one of two regiments, the 16th being the other, each of two battalions, deemed ready enough in 1809 to accompany Wellesley's army on its march north from Lisbon to attack Marshal Soult's army at Oporto.
|
 |
| An officers gorget circa 1800. |
 |
| A proclamation to the citizens of Oporto by Sir Arthur Wellesley, commanding British and Portuguese troops, confirming their liberation from French occupation, dated 13th May 1809. |
The Bridge of Boats disaster would come back to haunt Marshal Soult and the French troops sent to the Iberian Peninsula, becoming a cause célèbre that would rally the Portuguese to join their reformed military, and thus form a significant contribution to Wellington's Anglo-Portuguese army that would eventually liberate both Spain and Portugal and the invasion of Southern France in 1814.
 |
| A model depicting the tragedy that followed Marshal Soult's breaking the defences of Oporto and entering the city leading to the massacre of Portuguese civilians at the 'bridge of boats', as covered in the previous post. |
Point 5 - Church of the Lord of Bomfim
Picking up where I left off, looking at the Praça da Batalha (Point 2), we followed the old streets out towards a key landmark in both battles of Oporto, namely, what was at the time, the chapel of Bomfim but was later developed in the later nineteenth century into a church.
Having studied Fortescue's map of the battle area, complete with contours, I knew the area would have been on a hill slope outside of the original town wall, and so it was reassuring to turn a bend in the street seen below, with a gentle hill slope before us leading up to the church.
 |
| The Church of the Lord Bonfim atop the hill that was a feature on Fortescue's map and its key position back in 1809 offering a clear line of sight for French guns covering the road to Valongo and the northern wall of the Bishop's Seminary. |
The Parish church of Bonfim has a history dating back to the existence of a chapel on its current site in 1786. The current church was built between 1874 and 1894, as the population of the parish became part of the growing city of Porto and the existing chapel was no longer sufficient.
 |
| My interpretation of Fortescue's map saw be creating the two routes out through the city wall, with the windmill and small building close by representing the chapel, marking the site of the original chapel of Bomfin, and with a French column already marching along the Valongo road to the left of the tower, as guns and infantry march through the other gate to secure the hill as the British attack develops. |
The high ground around Bomfin was part of the original Portuguese defences back in March 1809 when Soult's II Corps arrived before the city, as shown on Oman's map, and it was from the heights of Bomfin that General Goy first got news of the British boats crossing to occupy the Seminary, which he would have been able to observe from here, as recounted by Oman;
'It had been only at half-past ten that Foy, riding along the heights by the Chapel of Bom Fin, had been informed that there were boats on the river, filled with red-coated soldiery. It took him wellnigh three-quarters of an hour to bring up his nearest regiment, the 17th Leger, and only at 11.30 did the attack on the Seminary begin.'
Oman made the additional observation of the importance of the heights at Bomfin;
There were only two artillery positions on the French bank, from which the Seminary could be battered: one, close to the water's edge, was completely under the guns of the Serra convent. The other, on the heights by the chapel of Bom Fin, was rather distant, and could not be used against boats crossing the river, as they would be invisible to gunners working on this emplacement. Cannon placed there might do some damage to the Seminary buildings, but could not prevent the garrison from being reinforced.'
In addition from here, the heights would have given a grandstand view of the French retreat from the city as Soult realised the game was up and that his army had to get out of town immediately or all was lost.
'As the British went pouring through Oporto the whole population, half mad with joy, stood cheering at the windows and on the roofs, waving their handkerchiefs and shouting Viva. The rabble poured down into the streets, and began to attack the French wounded, so that Sherbrooke had to detach a company to protect them from assassination.
 |
| The view today towards the Seminary in line with the yellow crane tower, and slightly more built-up than it would have been in 1809. |
When Soult found himself thus attacked in the flank, he saw that there was no more to be done, and bade the whole army retreat at full speed along the road to Vallongo and Baltar. They went off in a confused mass, the regiments all mingled together, and the artillery jammed in the midst of the column.
 |
The withdrawal of French troops from Porto before the pursuit of Anglo-Portuguese army under the command of Sir Arthur Wellesley. May 12th, 1809. Perhaps the chapel to the right, portrayed in this period illustration is that on Bomfin hill.
|
Hill came out of the Seminary and joined in the pursuit, which was urged for three miles. 'They made no fight,' writes an eye-witness, 'every man seemed running for his life, throwing away their knapsacks and arms, so that we had only the trouble of making many prisoners every instant, all begging for quarter and surrendering with great good humour'.
. . . Advancing cautiously along the river bank, Murray suddenly saw the whole French army come pouring past him in total disorder on the line of the Vallongo road. He might have made an attempt to throw himself across their path, or at least have fallen upon their flank and endeavoured to cut the column in two ; but thinking them far too strong for his small force, and forgetting their demoralization, he halted and allowed them to go by.
 |
| Major General John Murray advances with the light dragoons attempting to cut off the French retreat route along the road to Valongo out of Oporto. |
When all had passed, General Charles Stewart, who had been sent in search of Murray by the Commander-in-chief, came galloping up to the force, and took from it a squadron of the 14th, with which he made a dash at the enemy's last troops. The French had now formed a sort of rearguard, but the dragoons rode into it without hesitation.
 |
| The French retreat route forced to head away towards Amarante by the rapid advance of British trrops through Oporto is illustrated well in this map by John Fawkes, together with Major General John Murray's ponderous advance from the crossing at Avintes and his lack-lustre pursuit of the French rearguard, partially made good by the intervention of General Charles Stewart and the 14th Light Dragoons. |
The French generals were bringing up the rear, and trying to keep their men steady. Delaborde was unhorsed and for a moment was a prisoner, but escaped owing to his captor being killed. Foy received a sabre cut on the shoulder. The infantry broke, and nearly 300 of them were cut off and captured. But the dragoons also suffered heavily; of about 110 men who took part in the charge no less than thirty-five men were killed and wounded.
 |
| 'General Charles Stewart. . . came galloping up to the force, and took from it a squadron of the 14th, with which he made a dash at the enemy's last troops. The French had now formed a sort of rearguard, but the dragoons rode into it without hesitation.' |
Murray, who watched the whole skirmish from his position on a neighbouring hillside, gave no assistance to his cavalry, though the intervention of his two battalions would have led to the capture of the whole of Soult's rearguard. It was to infantry of Sherbrooke,s division that the dragoons turned over their prisoners before rejoining their other squadron.
So ended the battle of Oporto, . . '
Point 6 - São João da Foz
On the return leg of our boat trip along the Douro we travelled on past our embarkation jetty and headed along the river to its mouth at São João da Foz, highlighting the possibility of using the vintage tram system that travels along the river to the seaside resort.
One of the principle reasons Marshal Soult was caught off guard in the battle was his conviction that Wellesley would attempt his crossing down stream nearer the coast using a fleet of local fishing boats, supported by the Royal Navy to assist him, as described by Oman;
'Meanwhile the only danger which the Marshal feared was that Wellesley might send forward the fleet of fishing-boats which had carried Hill to Ovar, bring them to the estuary of the Douro, and use them to pass troops across its lowest reach, just within the bar at its mouth.
 |
| Oman's map illustrates the importance of São João da Foz, anchoring the line of Portuguese defences to the heights of Bomfin, and providing a secure base for Soult's cavalry to patrol the area of the river he thought Wellesley would most likely attempt to cross. |
Accordingly he told Franceschi to patrol carefully the five miles of the river that lie between Oporto and the sea. The infantry was comfortably housed in the city, with pickets watching the quays: every boat on the river, as it was supposed, had either been destroyed or brought over to the north bank.The Camelia were in full bloom the day we visited and were delight to the eye.
He also wrote specifically about the massive contribution Portugal made to the Allied victory in the face of huge financial burdens;
In addition Carolyn and I would express our appreciation for the Portuguese people we met on this trip and in other visits to the country, with Portugal holding a special place of affection for both of us and I would encourage other folks who haven't been, to put Portugal on their 'must visit' list.


_march_14_1653_(Johannes_Lingelbach,_1660).jpg)


,_RP-P-OB-81.795_(cropped).jpg)


.gif)


.jpg)


